Are you looking for the best Windows 10 emulators for Android? Then read this article. Sometimes we need a Windows operating system but due to the lack of a computer, we cannot run the Windows system and we look for ways with the help of which we can run the Windows operating system on our Android phone itself. So if you are one of them who is looking for an emulator that can run Windows 10 on your Android device. You are at the right place, this article will let you know about all how you can run Windows 10 on your Android device.
Although Android emulators like Nox, Blues Take, and Ko Player are very common and quite popular in the market there are plenty of Android emulators available as well windows emulators are not that popular, and there are only a few available in the market.
We have found two best Windows 10 emulators for Android that can perfectly emulate Windows 10 on Android.
Best Windows 10 Emulator for Android Devices
In this article, we have mentioned only two emulators but both are best in their work. Although these are not so popular but can be used efficiently by users to run Windows OS on Android smartphones. So without wasting further ado let’s get into it.
1. Wine 3.0

Wine 3.0 is the best Windows emulator for Android out of two. That’s why we have put it at the top of the list. The reason behind putting it on the top is some extra features that Wine 3.0 has to keep its users engaged. Earlier Wine emulator was released as a limited trial period product by the developer of this emulator for testing purposes.
The Trial version became a hit product but the developers didn’t bring out the final product. Wine 3.0 comes with all the basic features that need to run Windows on an Android device such as minimal graphics, usable programs and software, playable games, and more.
However, it is suggested that you need an x64 Intel processor or more than that to run the program properly.
If you know the full form of Wine, it is (Wine is not an emulator) that’s because of the copyright values, you can not directly run Windows on any Android platform. That’s why Wine 3.0 deploys a cross-compatible layer between Wine and Android so that the user can access the Windows apps of their choice.
How to Download and Install Wine 3.0
You have to download it from the link we have mentioned as the final software was never released, so it is not on Google PlayStore yet. You might also need the ARM architecture to use the program properly. Anyway, don’t go to the technical terms just download the program and see whether is working or not.
If you are not getting the suitable file from the download link, follow the steps to download and install the application:
- Head over to the official site of Wine 3.0 HQ, where you can find various versions of the application which you can download. Or you can directly download it from here.
- If you have an x86 Intel processor-based device on which you are going to install the application then go for the wine-3.0-x86.apk.
- If you have an ARM-based device then go for the Wine-3.0-arm.apk file.
- Make sure that the file is downloaded in the local storage, if not then move the file to the local storage after the downloading process is complete.
- After this, enable the application installation from the Unknown Sources.
- After enabling it, you will be able to install the application.
How to use Wine 3.0 Emulator
Now, the Wine application is installed on your device and ready to use. To use Wine download some Windows software that is in .exe format and put it into the device’s local storage.
Follow the steps below to use the Windows application on your Android device:
Step 1: After the Wine app is installed on your device, open the application.
Step 2: First you’ll see a dialog box full of options, you need to open the control panel where you will see an option to add/remove programs. You can use those options to install or uninstall any Windows application from the device.
Step 3: Click on the add option and then you can add the .exe file of the Windows app you want to use on your device. And it will be automatically installed after you select it through the file explorer.
Note: The above steps are tested on the compatible processor that is mentioned above, if you have any incompatible device, these steps might not work for you. To install the application on a compatible device and then go through the steps again.
2. LIMBO PC EMULATOR
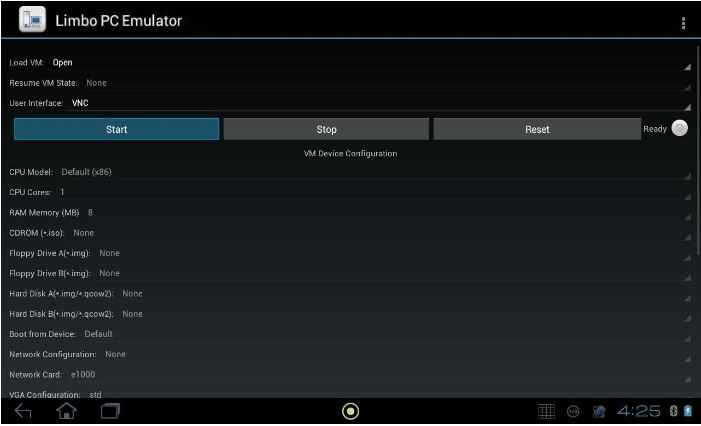
Limbo PC Emulator is another best emulators for Android devices to run Windows programs. Although it is not number one on our list, this application works very well and competes with the Wine emulator in every task. This emulator helps you to run Windows 10/8/7 on your device.
Let’s go through the whole process of how to download and install it.
Read More: 10 Best Antivirus For Android For Free 2022
Download and Install the Limbo PC Emulator
According to the data, currently, the application is available on Google Playstore. So download the application from the link given below and let’s configure it.
Steps to Install and Use the Limbo PC Emulator:
Step 1: Download the Limbo app from the link given above and it will automatically install on your device because it is Google Playstore’s link.
Step 2: Now you need to download some Windows image files by clicking here.
Step 3: Now after the image file gets downloaded, go to the device storage and locate the folder named Limbo.
Step 4: Once you have located the folder, copy and paste the download file into that particular folder.
Step 5: Now, open the Limbo App and set the configurations as stated here:
- Now as the app opens, leave ‘Load Machine:’ set to ‘None.’
- In the CPU/Board section, set the values according to your Android phone and It is recommended that all other values be left at their default values.
Step 6: After the configuration is done, tap on the Hard Disk A, the file manager will open, and then select the image file that you moved to the limbo folder.
Step 7: Now click on the advanced tab in the Limbo application then select the full-screen option.
Now it’s done, you have completed the process and installed the Limbo application, now you can use any Windows application on your Android device.
Mustafa Al Mahmud is the founder and owner of Gizmo Concept, a leading technology news and review site. With over 10 years of experience in the tech industry, Mustafa started Gizmo Concept in 2017 to provide honest, in-depth analysis and insights on the latest gadgets, apps, and tech trends. A self-proclaimed “tech geek,” Mustafa first developed a passion for technology as a computer science student at the Hi-Tech Institute of Engineering & Technology. After graduation, he worked at several top tech firms leading product development teams and honing his skills as both an engineer and innovator. However, he always dreamed of having his own platform to share his perspectives on the tech world. With the launch of Gizmo Concept, Mustafa has built an engaged community of tech enthusiasts who look to the site for trusted, informed takes on everything from smartphones to smart homes. Under his leadership, Gizmo Concept has become a top destination for tech reviews, news, and expert commentary. Outside of running Gizmo Concept, Mustafa is an avid traveler who enjoys experiencing new cultures and tech scenes worldwide. He also serves as a tech advisor and angel investor for several startups. Mustafa holds a B.S. in Computer Science from HIET.