Why convert Blu-ray and DVD movies to digital format for easy playback?
Converting Blu-ray and DVD movies to digital format for easy playback offers many benefits beyond just convenience. It can save you money, provide high-quality playback, make movies more accessible, and offer environmental benefits. These advantages make it a popular choice for people who want to modernize their movie collection and make the most of their viewing experience.
The best Blu-ray ripping software: VideoByte BD-DVD Ripper
VideoByte BD-DVD Ripper is a powerful software that allows you to rip Blu-ray and DVDs on Mac computers. With this tool, you can easily convert your Blu-ray and DVD movies to digital formats that can be played on various devices like smartphones, tablets, gaming consoles, and smart TVs. In this guide, we will show you how to use VideoByte BD-DVD Ripper to rip Blu-ray on Mac.
Read More: What’s the First 3D Game in the World 2023?
How to Rip Blu-ray Discs with VideoByte BD-DVD Ripper
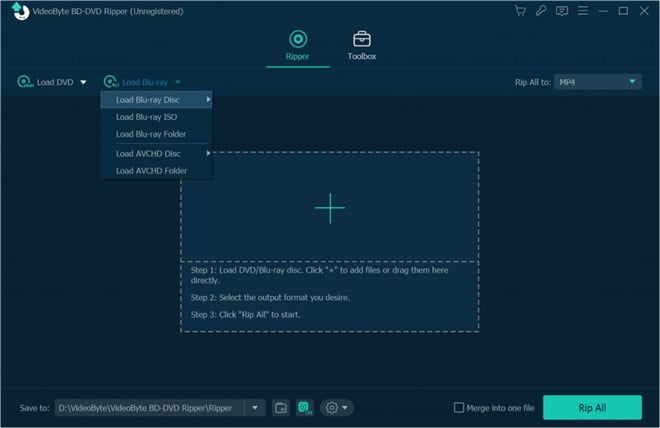
Step 1: Load the Blu-ray Disc
Insert the Blu-ray disc you want to rip into the disc drive of your Mac. Launch VideoByte BD-DVD Ripper, and click on the “Load Disc” button. The software will detect the disc automatically and start scanning the contents. Once the scanning process is complete, you will see a list of all the titles available on the disc. This is the best Blu-ray ripper for MAC.
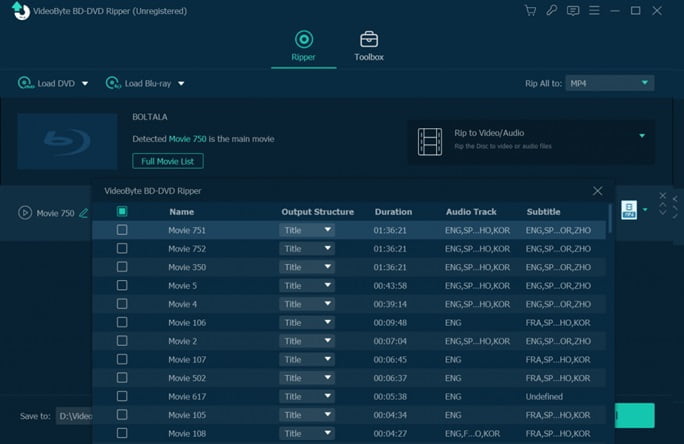
Step 2: Select the Titles to Rip
Not all titles on the Blu-ray disc are necessary, so you need to select the ones you want to rip. You can preview each title by clicking on it and selecting the “Preview” button. Once you have identified the titles you want to rip, select them by checking the boxes next to the titles.
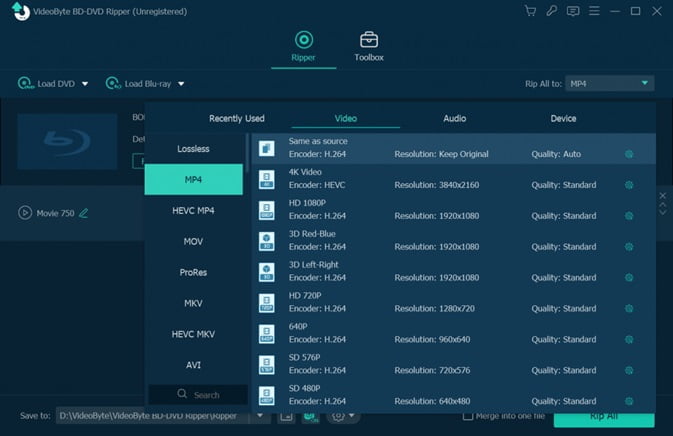
Step 3: Choose the Output Format
After selecting the titles, you need to choose the output format. VideoByte BD-DVD Ripper supports a wide range of output formats, including MP4, MOV, AVI, MKV, and more. You can choose the format that is compatible with your device by clicking on the “Profile” button and selecting the format from the dropdown menu.
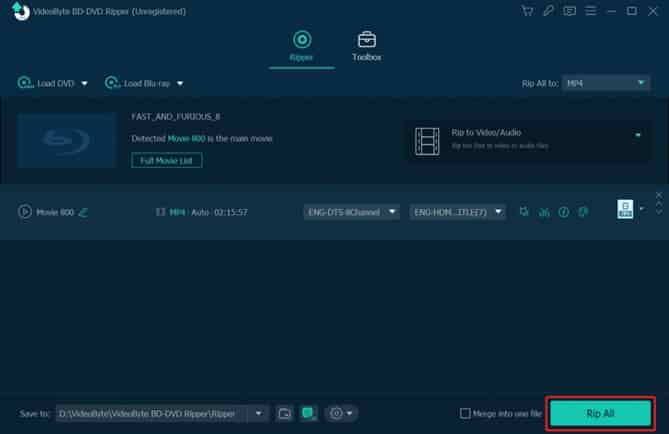
Step 4: Start Ripping
After selecting the output format, customizing the output settings, and choosing the output folder, you can click on the “Convert” button to start the ripping process. The software will begin ripping the selected titles to the specified format and saving them to the output folder.
Step 5: Check the Ripped Files
Once the ripping process is complete, you can check the ripped files by clicking on the “Open” button next to the output folder. You can now transfer the ripped files to your device and enjoy watching them anytime, anywhere.
More about VideoByte BD-DVD Ripper
Sure, here are some additional tips and information about using VideoByte BD-DVD Ripper to rip Blu ray on Mac:
- GPU Acceleration: VideoByte BD-DVD Ripper supports GPU acceleration, which allows you to speed up the ripping process significantly. You can enable GPU acceleration by clicking on the “Preferences” button and selecting the “Acceleration” tab. From there, you can choose the hardware acceleration method that is compatible with your graphics card.
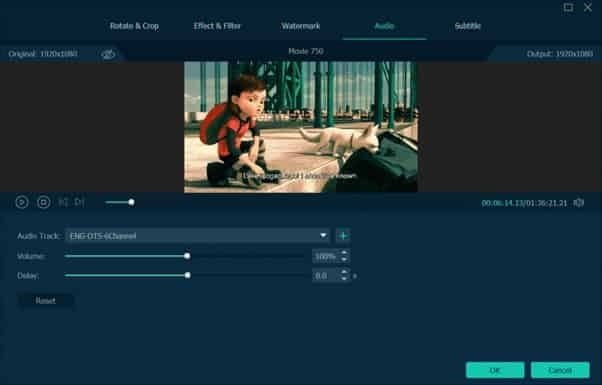
- Subtitle and Audio Track Selection: When you load a Blu-ray disc into VideoByte BD-DVD Ripper, the software will automatically select the default audio track and subtitle. However, you can choose a different audio track or subtitle by clicking on the “Audio” or “Subtitle” buttons and selecting the track or subtitle you want to use.
- Trim and Crop Video: VideoByte BD-DVD Ripper also allows you to trim and crop the video to remove unwanted parts of the movie. To do this, you can click on the “Edit” button and select the “Trim” or “Crop” tab. From there, you can adjust the video duration or crop the video to remove black bars or unwanted parts of the image.
- Batch Conversion: If you have multiple Blu-ray discs that you want to rip, VideoByte BD-DVD Ripper also supports batch conversion. To do this, you can load multiple discs into the software, select the titles you want to rip, and then choose the output format and settings. The software will automatically rip all the selected titles and save them to the specified output folder.
- Backup Blu-ray Discs: In addition to ripping Blu-ray discs to digital formats, VideoByte BD-DVD Ripper also allows you to back up Blu-ray discs to ISO files. This is a useful feature if you want to create a digital backup of your Blu-ray disc or burn the ISO file to a new disc in the future.
Conclusion
In conclusion, VideoByte BD-DVD Ripper is a powerful and versatile tool for ripping Blu-ray discs on Mac. With its user-friendly interface and comprehensive features, you can easily convert your Blu-ray movies to digital formats that can be played on various devices. Whether you want to watch your favorite movies on the go or create a backup of your Blu-ray collection, VideoByte BD-DVD Ripper is a great choice.
Mustafa Al Mahmud is the founder and owner of Gizmo Concept, a leading technology news and review site. With over 10 years of experience in the tech industry, Mustafa started Gizmo Concept in 2017 to provide honest, in-depth analysis and insights on the latest gadgets, apps, and tech trends. A self-proclaimed “tech geek,” Mustafa first developed a passion for technology as a computer science student at the Hi-Tech Institute of Engineering & Technology. After graduation, he worked at several top tech firms leading product development teams and honing his skills as both an engineer and innovator. However, he always dreamed of having his own platform to share his perspectives on the tech world. With the launch of Gizmo Concept, Mustafa has built an engaged community of tech enthusiasts who look to the site for trusted, informed takes on everything from smartphones to smart homes. Under his leadership, Gizmo Concept has become a top destination for tech reviews, news, and expert commentary. Outside of running Gizmo Concept, Mustafa is an avid traveler who enjoys experiencing new cultures and tech scenes worldwide. He also serves as a tech advisor and angel investor for several startups. Mustafa holds a B.S. in Computer Science from HIET.