Change MAC Address on Android: You may be looking for how to change the MAC Address on an Android phone. Please read this article to the end. Here you will learn how to change the MAC Address on a rooted and without root Android smartphone.
What is MAC Address?
MAC (Media Access Control) is a unique ID consisting of a 12-digit hexadecimal number found on each of your Android smartphone hardware. This identifier code helps to distinguish a specific device above a cluster of devices connected to a particular network. If you browse the web from your Android phone using a WiFi network, your WiFi device’s network adapter must have a MAC address to set up a connection and transfer data over the network.
MAC Address looks like this XX::XX:XX:XX:XX: XX, where each X is a hexadecimal character i.e. ranging from 0-9 or AF. Example MAC Address 1A:2B:3C:4D:5E:6F where the first 6 digits specify your manufacturer’s brand and the last six digits specify your network interface card.
There are many instances where someone has blocked your device from connecting to their router, what should you do in that case? Changing the MAC address of your Android device will work in this case.
If you are connected to WiFi but don’t want to leave any trace of your presence on the network like you want to protect your privacy, in that situation too you can change your MAC Address on Android.
For example, when your ISP blocks service to a set of MAC addresses, you can change the MAC address to gain internet access. Of course, MAC addresses can be changed for many other malpractices. However, the tutorial on changing MAC addresses here doesn’t teach such illegal practices, we’re just giving you additional insight.
How to change MAC address on Android on Android Phone Root and No-Root
If your Android device is rooted you can easily change your MAC address but what if not? Don’t worry we have a trick to change your MAC address without having to root your Android smartphone. But if you want to change the MAC address permanently, your Android phone must be rooted. However, if you just want to change it temporarily, you don’t have to.
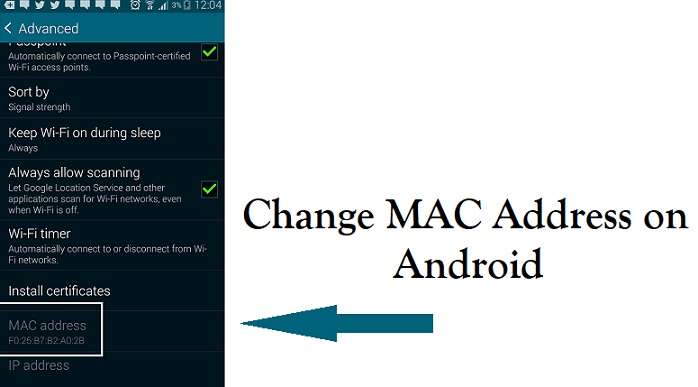
However, before continuing to change the MAC Address, let’s first learn how to see the MAC Address on an Android phone. We highly recommend that you take note of your MAC address before you start experimenting and you also need to know the connection name. To get this information please follow the steps below:
MAC address changer android
- Go to settings and then go to WiFi.
- Now, you will see a gear at the top of this screen, click on the button. But if you don’t see it, look for the option “Configure WiFi” and click on it. Some Android systems have an Advanced option on WiFi, MAC addresses can also be found there.
- Voila! You can find the MAC address at the bottom of this screen. Take notes!

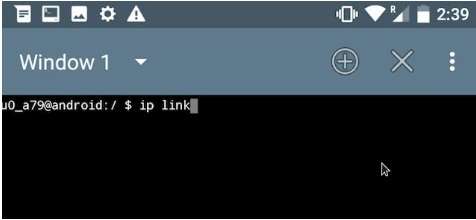
- To get the network interface name, you must install the Terminal Emulator for Android. Go to Google Play Store and download or click this link to get it.
- Once you have downloaded it, install it and open it.
- Type the following command: ip link
- Your screen will be filled with a lot of information, important and unimportant. Remember, we told you to keep a record of your MAC address. Just look for that MAC address under “link/ether” in all cases.
One of the codes that match your MAC address means is the name of your network interface. For most devices, the connection name is “wlan0” or “eth0”.
Now you know the MAC address and connection name. You can keep changing MAC addresses by using only this terminal emulator app. Before that, you need to have a valid MAC address by creating one from this link. Once you have the new MAC address, just follow the steps below.
- Launch the Terminal Emulator
- Just type the following command: ip link set wlan0 address XX:XX:XX:YY:YY: YY, where wlan0 is the interface name and XX:XX:XX:YY:YY: YY is the MAC address you want to assign.
It is important to remember that the manufacturer’s name must remain unchanged when changing the MAC address i.e. XX:XX: XX (first 6 digits) must be the same as before, otherwise you may face many authentication issues. The MAC Address here only changes temporarily and when you restart the device, your previous MAC address will return to its original state.
Above is how to change MAC Addresses on a no-rooted Android phone. For rooted devices, you have many options to choose from. Here are some techniques you can use.
1. Using the BusyBox App
You will still need a Terminal Emulator for this method. Open Terminal and type the following command.
- su -> This will take you to superuser/root mode
- busybox iplink show wlan0 -> This will show the current MAC address
- busybox ifconfig wlan0 hw ether XX:XX:XX:XX:XX: XX –> configure new MAC address
- busybox iplink shows eth0 -> this is to check if the MAC address has been changed or not.
2. Using the ChameleMAC App
Download and install the app from the link above and follow the steps.
- Open the app, and it will ask for root permission. Just give it!
- Then click the generate random MAC button to generate a random valid MAC address.
- Finally, if you find the generated MAC address is good enough, you can simply click apply new MAC to ask for confirmation of the change or you can generate another random MAC address before applying it.
The final word
Some Android phones don’t let you change the MAC address without root access, but if you’re lucky enough you’ll be able to change it. As the Android system improves new security features with each update, it becomes difficult to change the Android MAC Address permanently.
You can try any way you like to change MAC Addresses on your Android phone. But, remember! All your experiments to change the Android MAC Address are entirely at your own risk, so accept all the risks.
Mustafa Al Mahmud is the founder and owner of Gizmo Concept, a leading technology news and review site. With over 10 years of experience in the tech industry, Mustafa started Gizmo Concept in 2017 to provide honest, in-depth analysis and insights on the latest gadgets, apps, and tech trends. A self-proclaimed “tech geek,” Mustafa first developed a passion for technology as a computer science student at the Hi-Tech Institute of Engineering & Technology. After graduation, he worked at several top tech firms leading product development teams and honing his skills as both an engineer and innovator. However, he always dreamed of having his own platform to share his perspectives on the tech world. With the launch of Gizmo Concept, Mustafa has built an engaged community of tech enthusiasts who look to the site for trusted, informed takes on everything from smartphones to smart homes. Under his leadership, Gizmo Concept has become a top destination for tech reviews, news, and expert commentary. Outside of running Gizmo Concept, Mustafa is an avid traveler who enjoys experiencing new cultures and tech scenes worldwide. He also serves as a tech advisor and angel investor for several startups. Mustafa holds a B.S. in Computer Science from HIET.