
Reset Epson l1300: Problems with Epson printers are not far from errors that make the printer have to be reset. The Epson L1300 printer is no exception, it is a printer with quality printing functions from Epson.
Printer errors that often occur are the printer has a blink on the paper indicator light and the ink blinks alternately. For that, we need a resetter that can solve this problem.
Why does blink happen? Because the L1300 printer and other Epson printers have exceeded the maximum printing limit. For that, so that the printer can be used again, it must be reset using the Epson L1300 adjustment software.
Read More: Download Epson L360 Printer Driver
Epson l1300 Resetter/Epson l1300 blinking ink and paper light
Like most resetter programs, the Epson L1300 Adjustment Program is also a printer reset program. You can easily use this L1300 resetter on your computer or laptop without any hassle.
You can download this Epson L1300 resetter program for free and easily. For how to use it, please read this article to the end. The following is the download link, please click it, and then it will be taken to the Mediafire website display.
Click Download on the green button on the right. Wait a few moments for the download to complete and it will automatically be saved on your laptop / PC.
Epson l1300 resetter free download (Mediafire)
How to Reset Epson L1300
After you have successfully downloaded the resetter application above, here is a step-by-step guide to reset the Epson L1300 printer.
First, extract the downloaded software using Winrar. Then temporarily turn off the antivirus on your laptop / PC. The purpose of temporarily turning off the antivirus is so as not to detect this resetter program as a virus.
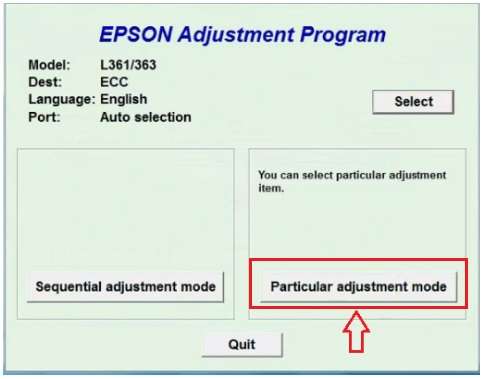
Then double-click on AdjProg_L1300.exe and wait a few moments for the program to open, it looks like this. Please click on the Particular adjustment mode.
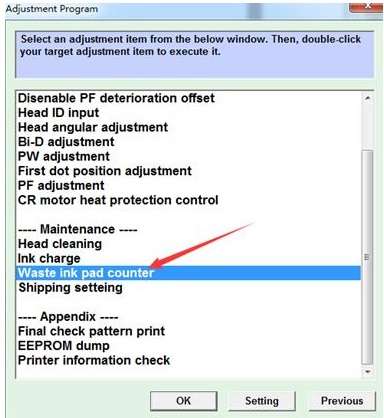
After that, wait for a few windows as below. To reset the Epson L1300 printer, please press on the Waste Ink pad counter, then click OK.
Look at the image below carefully, please check the Main pad Counter, then click the Check button (Check the current counter value).
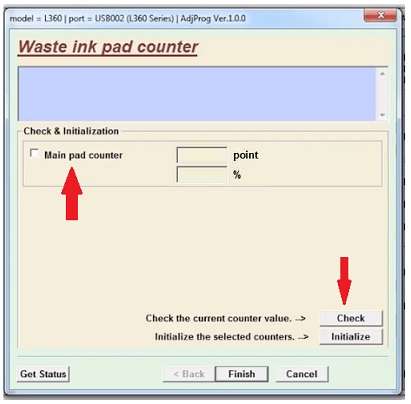
Then check the Main pad counter again, and click on the Initialize button (Initialize the selected counters). A command will appear to turn off the printer power button (the printer power button is pressed).
Finally, click Finish, and let the printer in a state of death for a few moments. Then turn it back on, then you have successfully reset the Epson L1300 printer and the printer can be used to print documents or photos.
After the printer is on, please reactivate your antivirus and the problem will be resolved. Please do the printing to check whether it can be used or not. If the print results are abnormal, you can do the cleaning, the method is the same as the Epson Printer Cleaning Way in general.
The resetter application that we provide can be used in all versions of Windows, both Windows XP, and Win 7 to Win 10. So you don’t need to worry about using it.
Conclusion
The Epson L1300 printer is not much different from other L Series series such as the L360, L220, or L800. So when there is a blinking error on the paper and ink indicator lights, it can be assumed that the printer asks to be reset.
NB: If you have followed the method above but it doesn’t work, then please repeat it carefully. Pay attention to the step-by-step that we provide. Admin is used to resetting the Epson L series printers and it is 95% successful.
Mustafa Al Mahmud is the founder and owner of Gizmo Concept, a leading technology news and review site. With over 10 years of experience in the tech industry, Mustafa started Gizmo Concept in 2017 to provide honest, in-depth analysis and insights on the latest gadgets, apps, and tech trends. A self-proclaimed “tech geek,” Mustafa first developed a passion for technology as a computer science student at the Hi-Tech Institute of Engineering & Technology. After graduation, he worked at several top tech firms leading product development teams and honing his skills as both an engineer and innovator. However, he always dreamed of having his own platform to share his perspectives on the tech world. With the launch of Gizmo Concept, Mustafa has built an engaged community of tech enthusiasts who look to the site for trusted, informed takes on everything from smartphones to smart homes. Under his leadership, Gizmo Concept has become a top destination for tech reviews, news, and expert commentary. Outside of running Gizmo Concept, Mustafa is an avid traveler who enjoys experiencing new cultures and tech scenes worldwide. He also serves as a tech advisor and angel investor for several startups. Mustafa holds a B.S. in Computer Science from HIET.